Certificate Replacement
- Replacing Certificates of the 64-Bit Euler Operating System
- Replacing the Local Certificate
- Replacing the Certificate for Connection to the Mail Server
- Replacing the Certificate for VIID Connection
- Replacing the Certificate for Target List Connection
- Replacing the Certificate for Southbound Connection
- Replacing the Certificate for Northbound Connection
Replacing Certificates of the 64-Bit Euler Operating System
Obtaining Certificates
Before replacing the operating system certificates, apply for the certificates from the CA. Table 6-17 lists the certificates.
Generating Certificates and Keys of the Server
Procedure
- Log in to the operating system as the root user. (
 How Do I Log In to the Operating System Through a Network Port?)
 - Set environment variables.
export LD_LIBRARY_PATH=/lib64:$LD_LIBRARY_PATH
- Generate the keystore file server.p12 for the server.
openssl pkcs12 -export -clcerts -in server.crt -inkey server.key -out server.p12
- Generate the encrypted private key server.key.
- Convert server.p12 into server.pem.
openssl pkcs12 -in server.p12 -out server.pem
The parameters in the preceding command are described as follows:
- -in: indicates the path of the pkcs12 file, including the file name.
- -out: indicates the path of the certificate or private key file, including the file name. The file name must be in *.pem format.
After the OpenSSL command is executed, the following information is displayed. Enter the password as prompted. After the password is entered, the server.pem file is generated in the directory where the OpenSSL command is executed.
Enter Import Password:
Enter PEM pass phrase:
Verifying - Enter PEM pass phrase
- In Enter Import Password, enter the password for accessing key library file server.p12.
- In Enter PEM pass phrase and Verifying - Enter PEM pass phrase, enter the password for accessing server.pem.
- Create an empty file server.key.
- Open the server.pem file, copy the character string (encrypted key) between -----BEGIN ENCRYPTED PRIVATE KEY----- and -----END ENCRYPTED PRIVATE KEY-----, and save it to the server.key file.
Copy -----BEGIN ENCRYPTED PRIVATE KEY----- and -----END ENCRYPTED PRIVATE KEY----- with the character string.

- Convert server.p12 into server.pem.
Generating Certificates and Keys of the Client
Procedure
- Log in to the operating system as the root user. ( How Do I Log In to the Operating System Through a Network Port?)
- Set environment variables.
export LD_LIBRARY_PATH=/lib64:$LD_LIBRARY_PATH
- Generate the keystore file client.p12 for the client.
openssl pkcs12 -export -clcerts -in client.crt -inkey client.key -out client.p12
- Generate the encrypted private key client.key for the client.
Convert client.p12 into client.pem.
openssl pkcs12 -in client.p12 -out client.pem
The parameters in the preceding command are described as follows:-in: indicates the path of the pkcs12 file, including the file name.
-out: indicates the path of the certificate or private key file, including the file name. The file name must be in *.pem format.
After the OpenSSL command is executed, the following information is displayed. Enter the password as prompted. After the password is entered, the client.pem file is generated in the directory where the OpenSSL command is executed.
Enter Import Password:
Enter PEM pass phrase:
Verifying - Enter PEM pass phrase:
- In Enter Import Password, enter the password for accessing key library file client.p12.
- In Enter PEM pass phrase and Verifying - Enter PEM pass phrase, enter the password for accessing client.pem.
- Create an empty file client.key.
- Open the client.pem file, copy the character string (encrypted key) between -----BEGIN ENCRYPTED PRIVATE KEY----- and -----END ENCRYPTED PRIVATE KEY-----, and save it to the client.key file.
Copy -----BEGIN ENCRYPTED PRIVATE KEY----- and -----END ENCRYPTED PRIVATE KEY----- with the character string.

- Make a trusted certificate keystore catrust.jks.
- Obtain server.p12 generated in Generating Certificates and Keys of the Server, copy it, and rename it "catrust.jks".
cp server.p12 catrust.jks
- Import the client certificate file client.crt to the keystore file catrust.jks.
keytool -import -v -file client.crt -storetype PKCS12 -keystore catrust.jks
The parameters in the preceding command are described as follows:-import: imports a signed digital certificate to the keystore.
-v: displays the detailed certification information in the keystore.
-file: indicates that the certificate to be imported is client.crt.
-storetype PKCS12: indicates that the type of the specified keystore is PKCS12.
-keystore: indicates that the keystore name is catrust.jks.
Enter the password for accessing catrust.jks (that is, server.p12) as prompted.
Enter yes to confirm whether to trust the certificate as prompted.
Check whether the client.crt certificate is trusted.
keytool -list -storetype PKCS12 -keystore catrust.jks
The parameters in the preceding command are described as follows:-list: displays the certification information in the keystore.
-storetype PKCS12: indicates that the type of the specified keystore is PKCS12.
-keystore: indicates that the keystore name is catrust.jks.
- Enter the password for accessing the client.crt file as prompted.
- Obtain server.p12 generated in Generating Certificates and Keys of the Server, copy it, and rename it "catrust.jks".
- Generate CA certificate ca.crt for two-way verification between IDE-daemon-host and IDE-daemon-client.
cat server.crt > ca.crt
echo -e >> ca.crt
cat client.crt >> ca.crt
- Delete the intermediate files and client.pem.
Replacing Certificates
Context
Table 6-18 lists the default certificates.

For security purposes, you are advised to replace the default certificate and key pair with your own certificate and key pair.
No. |
Certificate Type |
Path |
Certificate File Name |
|---|---|---|---|
1 |
Root certificate |
/home/data/miniD/driver/tools/ |
ide_daemon_cacert.pem |
2 |
Server signature certificate |
/home/data/miniD/driver/tools/ |
ide_daemon_server_cert.pem |
3 |
Private key of the server signature certificate |
/home/data/miniD/driver/tools/ |
ide_daemon_server_key.pem The default private key is MindStudio@123. |
4 |
Client signature certificate |
/home/data/miniD/driver/tools/ |
ide_daemon_client_cert.pem |
5 |
Private key of the client signature certificate |
/home/data/miniD/driver/tools/ |
ide_daemon_client_key.pem The default private key is MindStudio@123. |
Procedure
- Rename the keys and certificate files of the server and client.Table 6-19 Keys and certificate files
Original Name
New Name
server.key
ide_daemon_server_key.pem
server.crt
ide_daemon_server_cert.pem
client.key
ide_daemon_client_key.pem
client.crt
ide_daemon_client_cert.pem
ca.crt
ide_daemon_cacert.pem
- Log in to the operating system as the root user. ( How Do I Log In to the Operating System Through a Network Port?)
- Set environment variables.
export LD_LIBRARY_PATH=/lib64:$LD_LIBRARY_PATH
- Generate character string encryption files ide_daemon.secu and ide_daemon.store.
cd /home/data/miniD/driver/tools
./IDE-daemon-client --key
Enter the password as prompted.
- Generate the readable files secu and store of the ide_daemon.secu and ide_daemon.store files.
openssl base64 -out secu -in ide_daemon.secu
openssl base64 -out store -in ide_daemon.store
- Go to /home/data/miniD/driver/tools.
cd /home/data/miniD/driver/tools
- Open the ide_daemon.cfg file.
vi ide_daemon.cfg
- Change the value of SECU to the content in the secu file generated in Step 5.
Combine multiple lines of character strings in the secu file into one line and change the value of SECU to the combined character string.
- Change the value of STORE to the content in the store file generated in Step 5.
Combine multiple lines of character strings in the store file into one line and change the value of STORE to the combined character string.
- Save the ide_daemon.cfg file.
- Change the value of SECU to the content in the secu file generated in Step 5.
- Upload the files renamed in Step 1 to the /tmp directory.
- Use the certificate files in the /tmp directory to replace those in the /home/data/miniD/driver/tools directory.
cp /tmp/ide_daemon_server_key.pem /home/data/miniD/driver/tools/ide_daemon_server_key.pem
cp /tmp/ide_daemon_server_cert.pem /home/data/miniD/driver/tools/ide_daemon_server_cert.pem
cp /tmp/ide_daemon_client_key.pem /home/data/miniD/driver/tools/ide_daemon_client_key.pem
cp /tmp/ide_daemon_client_cert.pem /home/data/miniD/driver/tools/ide_daemon_client_cert.pem
cp /tmp/ide_daemon_cacert.pem /home/data/miniD/driver/tools/ide_daemon_cacert.pem
- Change the certificate file permissions.
cd /home/data/miniD/driver/tools
chown HwHiAiUser:HwHiAiUser ide_daemon_server_key.pem
chown HwHiAiUser:HwHiAiUser ide_daemon_server_cert.pem
chown HwHiAiUser:HwHiAiUser ide_daemon_client_key.pem
chown HwHiAiUser:HwHiAiUser ide_daemon_client_cert.pem
chown HwHiAiUser:HwHiAiUser ide_daemon_cacert.pem
- Verify the certificate validity.
openssl verify -CAfile ide_daemon_cacert.pem ide_daemon_client_cert.pem
openssl verify -CAfile ide_daemon_cacert.pem ide_daemon_server_cert.pem
- Restart the system for the new certificates to take effect.
reboot
Verification
Procedure
- Log in to the operating system as the root user. ( How Do I Log In to the Operating System Through a Network Port?)
- Check whether the IDE process is running properly.
When the MiNID acceleration module is installed on the , the IDE-deamon-host process is started on the server. Run the following command to check whether the process is running properly:
ps -ef | grep IDE-daemon | grep -v grep
If the following information is displayed, the IDE process is running properly and the certificates are successfully replaced:
HwHiAiU+ 2216 1 1 Mar12 ? 00:42:51 /home/data/miniD/driver/boot/../../driver/tools/IDE-daemon-host
Replacing the Local Certificate
Prerequisites
You have applied for the desired certificates from the CA or purchased a commercial certificate. Table 6-20 lists the required certificates.
Procedure
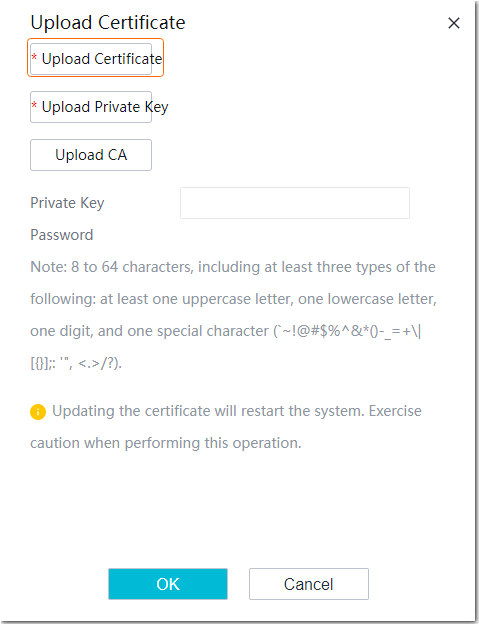
- Upload the root certificate, private key of the server signature certificate, and server signature certificate.
- Log in to the OMU portal as the admin user. (
 Logging In to the OMU portal)
 - Choose .
- Click Upload. In the dialog box that is displayed, upload the root certificate described in Prerequisites, as shown in Figure 6-37.
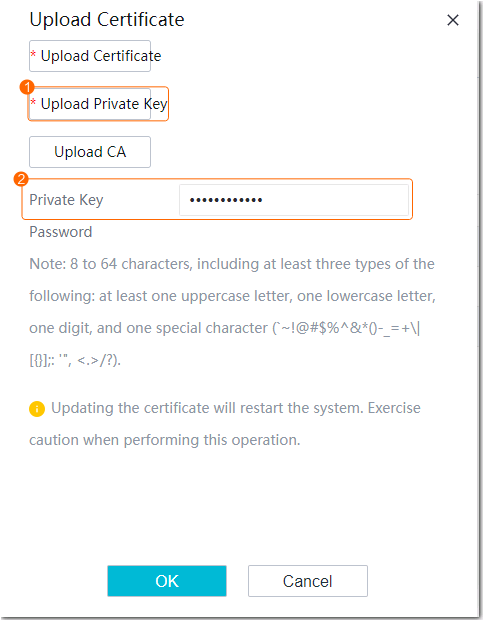
- Upload the private key of the server signature certificate and enter the key password (both of which are required in Prerequisites), as shown in Figure 6-38.
- (Optional) Upload the server signature certificate described in Prerequisites, as shown in Figure 6-39.
Updating the certificate will restart the system. To restore the default local certificate, refer to Restoring a Certificate.
- Log in to the OMU portal as the admin user. (

Restoring a Certificate
- Log in to the OMU portal as the admin user. ( Logging In to the OMU portal)
- Choose .
- Click Resume to restore the default certificate and key pair.
Operations
If the root certificate in the imported certificate is changed, the certificate of the connected camera also needs to be replaced. For details, see the product documentation of the corresponding camera.
Replacing the Certificate for Connection to the Mail Server
Prerequisites
You have obtained the certificate from the official website of the mail server provider if mail server connection has been configured.
If no mail server connection has been configured, you can visit https://curl.se/docs/caextract.html to obtain the general certificate.
Table 6-21 lists the required certificates.
Procedure
- Upload the digital certificate and the CRL.
- Log in to the OMU portal as the admin user. ( Logging In to the OMU portal)
- Choose .
- Upload the obtained digital certificate, as shown in Figure 6-40.
- (Optional) Upload the obtained CRL, as shown in Figure 6-41.

CRLs are used to verify the validity of peer device certificates to ensure secure communication. You must upload the digital certificate before uploading the CRL. Otherwise, the digital certificate will fail to be uploaded.
- Log in to the OMU portal as the admin user. (


Operations
- For security purposes, you are advised to periodically replace the digital certificate and CRL.
- Before a digital certificate or CRL expires, an expiration alarm will be generated to notify you of replacing the digital certificate or CRL with a new one.
Replacing the Certificate for VIID Connection
Procedure
- Upload the digital certificate and the CRL.
- Log in to the OMU portal as the admin user. ( Logging In to the OMU portal)
- Choose .
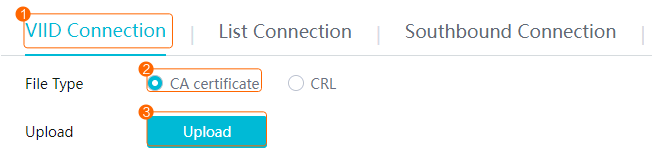
- Upload the digital certificate for VIID connection and your commercial certificate, as shown in Figure 6-42.
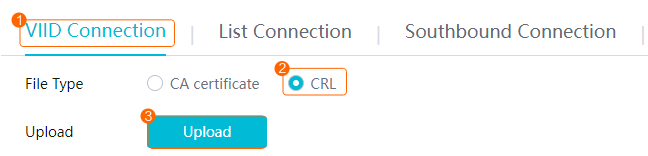
- (Optional) Upload the CRL of the VIID and your own CRL, as shown in Figure 6-43.
CRLs are used to verify the validity of the peer device's certificates to ensure secure communication. You must upload the digital certificate before uploading the CRL. Otherwise, the digital certificate will fail to be uploaded.
- Log in to the OMU portal as the admin user. (
Operations
- For security purposes, you are advised to periodically replace the digital certificate and CRL.
- Before a digital certificate or CRL expires, an expiration alarm will be generated to notify you of replacing the digital certificate or CRL with a new one.
Replacing the Certificate for Target List Connection
Procedure
- Upload the digital certificate and the CRL.
- Log in to the OMU portal as the admin user. ( Logging In to the OMU portal)
- Choose .
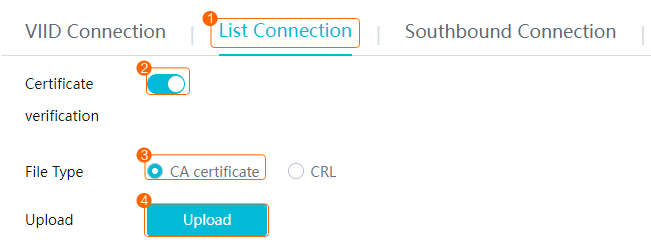
- Upload the certificate for target list connection and your commercial certificate, as shown in Figure 6-44.
Table 6-22 describes the parameters.
Table 6-22 Parameter descriptionParameter
Description
Certificate verification
This function is enabled by default.
- If this function is enabled, you need to upload the digital certificate.
Upload your own commercial certificate.
- If this function is not enabled, you do not need to import the certificate.
For security purposes, you are advised to enable this function.
- If this function is enabled, you need to upload the digital certificate.
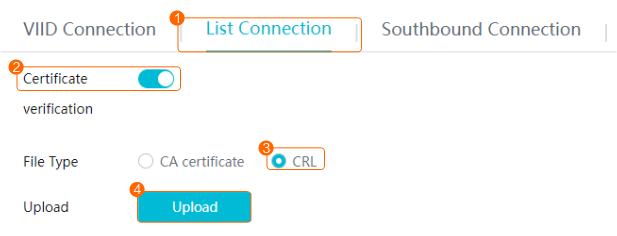
- (Optional) Upload the CRL for target list connection and your own CRL, as shown in Figure 6-45.
CRLs are used to verify the validity of the peer device's certificates to ensure secure communication. You must upload the digital certificate before uploading the CRL. Otherwise, the digital certificate will fail to be uploaded.
- Log in to the OMU portal as the admin user. (
Operations
- For security purposes, you are advised to periodically replace the digital certificate and CRL.
- Before a digital certificate or CRL expires, an expiration alarm will be generated to notify you of replacing the digital certificate or CRL with a new one.
Replacing the Certificate for Southbound Connection
Application Scenario
- Connecting cameras to the OMU portal
- Through HWSDK TLS
- If a camera uses the default HWSDK certificate, you do not need to upload the HWSDK certificate to the OMU portal.
- If a camera uses the HWSDK certificate issued by another CA, you need to upload the CA certificate corresponding to the new HWSDK certificate of the camera to the OMU portal. If cameras use HWSDK certificates issued by different CAs, you need to upload the CA certificates corresponding to the HWSDK certificates to the OMU portal in sequence.
- Through ONVIF HTTPS
In this scenario, you need to upload the CA certificate corresponding to the ONVIF certificate of the camera to the OMU portal. If cameras use ONVIF certificates issued by different CAs, you need to upload the CA certificates corresponding to the ONVIF certificates to the OMU portal in sequence.
- Through HWSDK TLS
Prerequisites
You have applied for the desired certificates from the CA or purchased a commercial certificate. Table 6-23 lists the certificates for SDK interconnection. Table 6-24 lists the certificates for southbound ONVIF interconnection.
No. |
Certificate |
Example |
|---|---|---|
1 |
Root certificate |
common_cacert.pem |
2 |
Server signature certificate |
common_server.pem |
3 |
Private key of the server signature certificate |
common_server.key You need to enter the certificate private key password when uploading the private key. |
Southbound ONVIF Interconnection Certificate
- Upload the digital certificate and the CRL.When the CA certificate or CRL is uploaded through southbound interfaces, the DCG is restarted and cameras connected to the device are temporarily offline.
- Log in to the OMU portal as the admin user. ( Logging In to the OMU portal)
- Choose Interconnection > Certificate Management > Third-Party Certificate > Southbound Connection > Southbound ONVIF Protocol Interconnection Certificate.
- Upload the digital certificate for southbound ONVIF interconnection and your commercial certificate, as shown in Figure 6-46.
- (Optional) Upload the CRL for southbound connection and your own CRL, as shown in Figure 6-47.
CRLs are used to verify the validity of the peer device's certificates to ensure secure communication. You must upload the digital certificate before uploading the CRL. Otherwise, the digital certificate will fail to be uploaded.
- Log in to the OMU portal as the admin user. (


SDK Interconnection Certificate
- Upload the digital certificate and the CRL.
- Log in to the OMU portal as the admin user. ( Logging In to the OMU portal)
- Choose Interconnection > Certificate Management > Third-Party Certificate > Southbound Connection > SDK Interconnection Certificate.
- Click Upload. In the dialog box that is displayed, upload the root certificate described in Prerequisites, as shown in Figure 6-48.
- Upload the private key of the server signature certificate and enter the key password (both of which are required in Prerequisites), as shown in Figure 6-49.
- Upload the server signature certificate described in Prerequisites, as shown in Figure 6-50.
- (Optional) Upload the CRL for southbound connection and your own CRL, as shown in Figure 6-51.
CRLs are used to verify the validity of the peer device's certificates to ensure secure communication. You must upload the digital certificate before uploading the CRL. Otherwise, the digital certificate will fail to be uploaded.
- Log in to the OMU portal as the admin user. (


Operations
- For security purposes, you are advised to periodically replace the digital certificate and CRL.
- Before a digital certificate or CRL expires, an expiration alarm will be generated to notify you of replacing the digital certificate or CRL with a new one.
Replacing the Certificate for Northbound Connection
Prerequisites
You have applied for the desired certificates from the CA or purchased a commercial certificate. Table 6-25 lists the required certificates.
Procedure
- Upload the digital certificate and the CRL.
- Log in to the OMU portal as the admin user. ( Logging In to the OMU portal)
- Choose Interconnection > Certificate Management > Third-Party Certificate > Northbound interconnection.
- Click Upload. In the dialog box that is displayed, upload the root certificate described in Prerequisites, as shown in Figure 6-52.
- Upload the private key of the server signature certificate and enter the key password (both of which are required in Prerequisites), as shown in Figure 6-53.
- Upload the server signature certificate described in Prerequisites, as shown in Figure 6-54.
- (Optional) Upload the CRL for northbound connection and your own CRL, as shown in Figure 6-55.
CRLs are used to verify the validity of the peer device's certificates to ensure secure communication. You must upload the digital certificate before uploading the CRL. Otherwise, the digital certificate will fail to be uploaded.
- Log in to the OMU portal as the admin user. (


- Replacing Certificates of the 64-Bit Euler Operating System
- Replacing the Local Certificate
- Replacing the Certificate for Connection to the Mail Server
- Replacing the Certificate for VIID Connection
- Replacing the Certificate for Target List Connection
- Replacing the Certificate for Southbound Connection
- Replacing the Certificate for Northbound Connection